Build a Fully Automated YouTube-to-Blog Pipeline with OpenClaw on AWS
Creating consistent, high-quality blog content is time-consuming and expensive. Traditional content creation costs $100-200 per article and takes hours of research and writing. What if you could automate the entire process—from finding the perfect source material to publishing a polished blog post?
In this tutorial, you'll build a fully automated pipeline using OpenClaw that transforms YouTube videos into SEO-optimized blog posts. The system doesn't just convert any video—it intelligently finds 10 candidate videos in your niche, transcribes the top 3, analyzes them for quality, and selects the best one to convert into a comprehensive article.
All through simple Telegram messages to your OpenClaw bot.
What you'll build: An automated system that takes a niche keyword like "pet insurance" and delivers a publication-ready blog post.
Time investment: 2 hours setup, then 5 minutes per post (fully automated).
Cost: ~$0.15 per quality blog post vs. $100-200 traditional.
Who this is for: SaaS companies, niche site owners, content marketers who need consistent, data-driven content.
What You'll Build
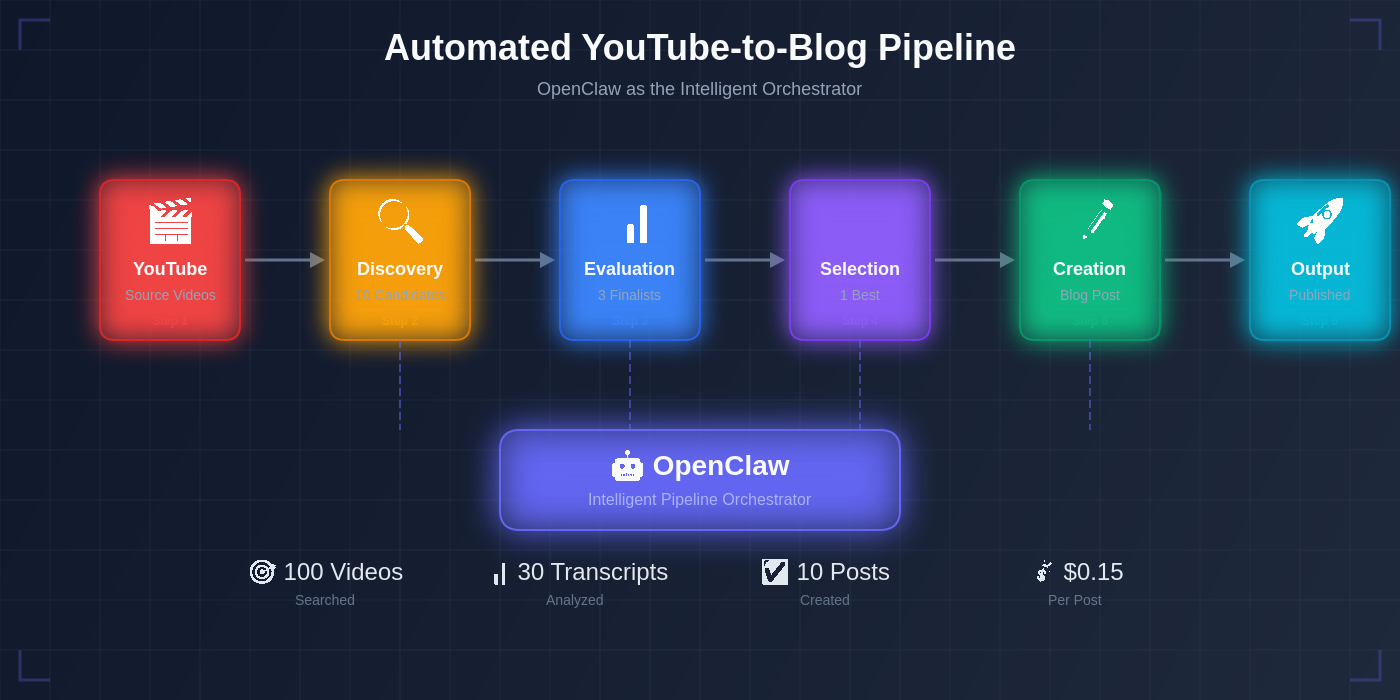
Pipeline architecture: YouTube → OpenClaw orchestration → Published blog post
This isn't about churning out low-quality content at scale. You're building a quality-first automation system that makes intelligent decisions:
The Pipeline Flow:
- Discovery: Find 10 candidate videos matching specific quality criteria
- Evaluation: Transcribe the top 3 most promising candidates
- Selection: Score transcripts on 5 dimensions (depth, clarity, SEO value, insights, quality)
- Creation: Transform the winner into a structured, SEO-optimized blog post
OpenClaw as the Orchestrator: OpenClaw handles browser automation, API calls, file management, and decision logic—all controlled through natural language Telegram messages.
Example Workflow: You message: "Create a blog post about pet insurance"
OpenClaw automatically:
- Searches YouTube for "pet insurance" videos
- Filters by duration (8-15 min), views (10k-100k), recency (last 2 years)
- Ranks by metadata quality
- Downloads top 3 videos via residential proxy
- Transcribes with AI
- Analyzes and scores all 3
- Selects the winner
- Converts to 2000-2500 word blog post
- Delivers to your workspace
End Result: One-time setup creates a reusable system. Message OpenClaw monthly for automated content generation.
What You'll Need
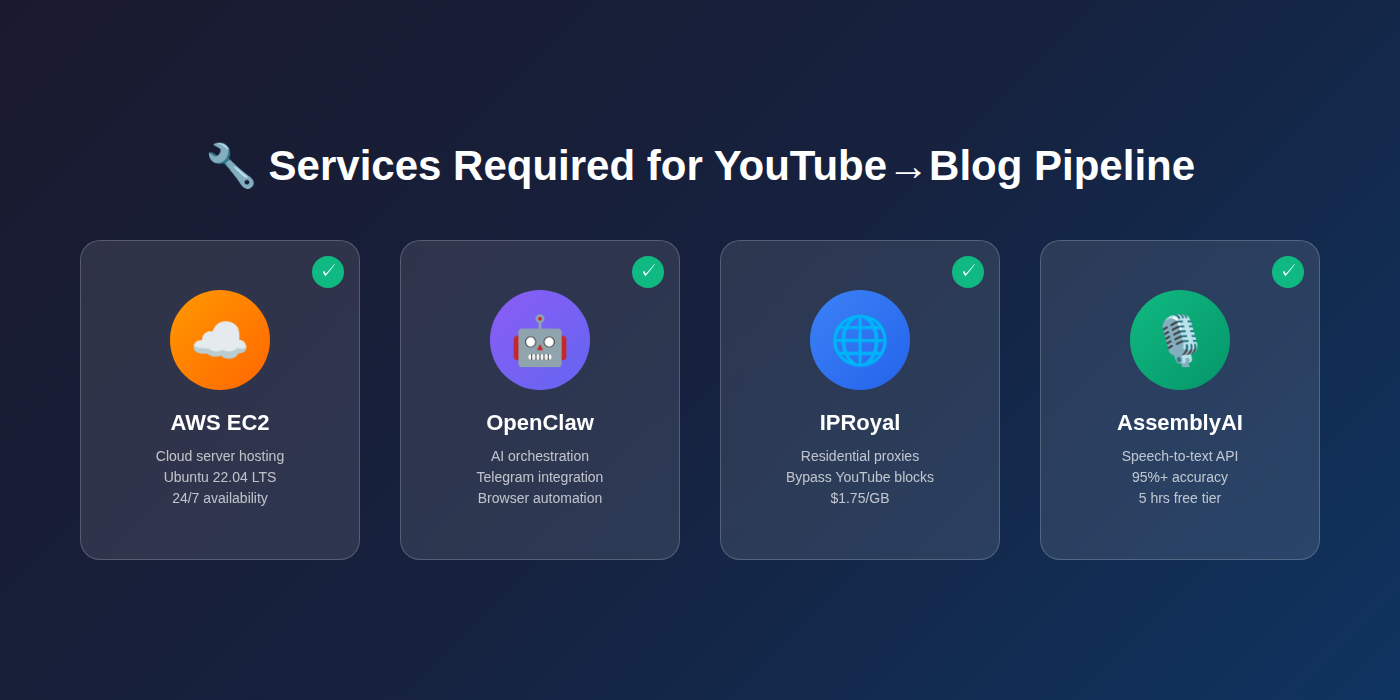 Four services work together to create your automation pipeline
Before starting, gather these accounts and services:
Infrastructure:
- AWS account with EC2 access (server to run OpenClaw)
- OpenClaw installed and connected to Telegram
- IPRoyal residential proxy account (
$1.75 minimum purchase) - AssemblyAI account (5 hours free tier, then
$0.37/hour)
Technical Requirements:
- Basic command line familiarity
- SSH access to your server
- Telegram account for bot control
Cost Breakdown:
- Initial setup: ~
$10-20one-time - Per blog post: ~
$0.15 (evaluating 3 transcripts) - Monthly (1 post):
$0.15 vs.$100-200traditional
Why You Need Each Service:
- AWS: Hosts your OpenClaw automation (cloud server)
- IPRoyal: Bypasses YouTube's blocks on cloud IPs (residential proxy)
- AssemblyAI: Converts video audio to accurate text (95%+ accuracy)
- OpenClaw: Orchestrates the entire workflow via Telegram
Step 1: Set Up Your AWS Infrastructure
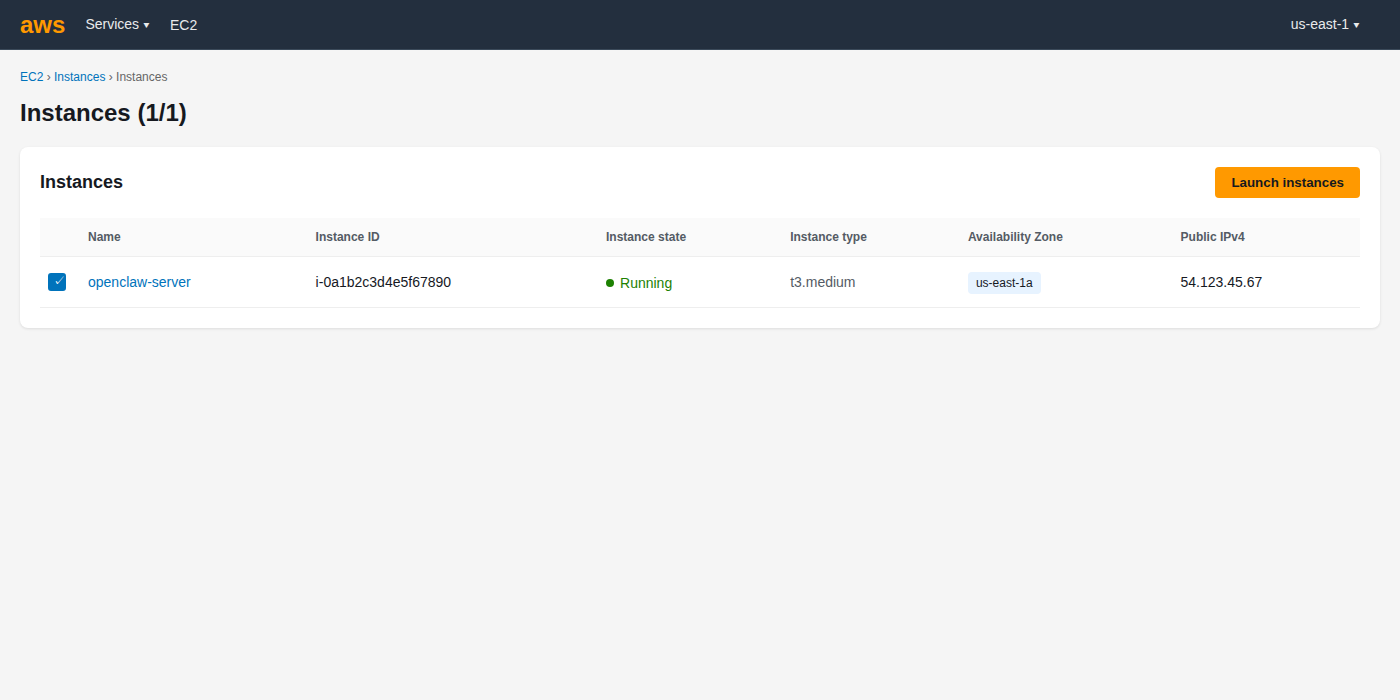 Your EC2 instance should show "running" status in the AWS console
Goal: Get a cloud server running that can host your automation 24/7.
We won't cover AWS setup in detail here—follow our comprehensive guide:
👉 Complete OpenClaw AWS Setup Tutorial
What you need before proceeding:
- Ubuntu 22.04 EC2 instance running (t3.medium recommended) — see AWS EC2 documentation for setup help
- SSH access configured and working
- Ability to connect to your server via terminal
Verification: Open your terminal and confirm you can SSH into your server:
ssh ubuntu@your-server-ip
If you see your server's command prompt, you're ready for Step 2.
Step 2: Install OpenClaw on Your Server
 Your OpenClaw bot should respond to messages in Telegram
Goal: Get OpenClaw running and connected to Telegram for message-based control.
We have a dedicated installation guide that covers:
- Node.js installation
- OpenClaw setup
- Telegram bot configuration
- Gateway initialization
👉 OpenClaw Installation & Telegram Setup Guide
What you need before proceeding:
- OpenClaw gateway running on your server
- Telegram bot created and connected
- Ability to message your bot and get responses
Verification: Open Telegram, find your OpenClaw bot, and send a test message:
Hello, are you there?
If OpenClaw responds, you're ready for Step 3.
Step 3: Set Up YouTube Video Discovery
 OpenClaw's discovery results: 10 quality candidates ready for evaluation
Goal: Teach OpenClaw to find quality YouTube videos for any niche you specify.
This step installs the tools OpenClaw needs to search YouTube, apply quality filters, and return candidate videos with metadata.
What we're teaching OpenClaw to do:
- Search YouTube for your target keyword (e.g., "pet insurance")
- Apply quality filters (8-15 min duration, 10k-100k views, uploaded in last 2 years)
- Extract metadata (title, view count, duration, description preview)
- Rank results by quality indicators
- Return top 10 candidates
Copy these instructions to OpenClaw via Telegram:
Set up YouTube video metadata discovery:

1. Install [yt-dlp](https://github.com/yt-dlp/yt-dlp) (latest version 2026.02.04 or newer)
2. Install Python packages for YouTube search and metadata extraction

3. Create a skill that can:
   - Search YouTube for a given niche keyword
   - Filter results by:
     * Duration: 8-15 minutes
     * Views: 10,000-100,000
     * Upload date: Last 2 years
   - Extract metadata for each video:
     * Title
     * View count
     * Duration (minutes)
     * Upload date
     * Description preview (first 200 characters)
   - Rank videos by view count
   - Return top 10 candidates

4. Test by finding 10 videos about "pet insurance"

Report back with a table showing: Video ID, Title, Views, Duration for all 10.
What OpenClaw will do: OpenClaw installs the required packages on your server, creates the video discovery script, and runs a test search. Within a few minutes, you'll receive a table of 10 pet insurance videos that match your criteria.
Expected Response: A formatted table showing 10 videos with their metadata—proof that the discovery system works.
Step 4: Set Up Video Download and Transcription
 Successful test: audio downloaded via proxy and transcribed to clean text
Goal: Teach OpenClaw to download video audio files and convert them to text transcripts.
This step is more involved because you need to set up external service credentials first.
Why you need two separate services:
- IPRoyal proxy: YouTube blocks AWS IP addresses from downloading videos. A residential proxy routes your requests through real residential IPs that YouTube allows.
- AssemblyAI: Converts audio files to accurate text transcripts (95%+ accuracy with speaker detection and punctuation).
First: Get Your Credentials
IPRoyal Setup:
- Go to iproyal.com/residential-proxies
- Sign up for an account
- Click "Buy Now" and purchase 1GB (
$1.75) - Navigate to Dashboard → Residential Proxies
- Click "Create a new order" if needed
- Copy these 4 values:
- Username: (e.g.,
oSiI2AilledhnyOV) - Password: (e.g.,
oE5oU2d73bpFBzWA) - Host:
geo.iproyal.com - Port:
12321
- Username: (e.g.,
AssemblyAI Setup:
- Go to assemblyai.com
- Sign up for a free account (5 hours free transcription)
- Navigate to Dashboard → API Keys
- Copy your API key (starts with a long string of letters/numbers)
Now: Configure OpenClaw
Copy these instructions to OpenClaw via Telegram (replace the bracketed values with your actual credentials):
Set up video download and transcription:

1. Install AssemblyAI Python SDK
2. Install packages needed for proxy-based video downloads

3. Configure IPRoyal residential proxy credentials:
   - Username: [paste your IPRoyal username]
   - Password: [paste your IPRoyal password]
   - Host: geo.iproyal.com
   - Port: 12321

4. Configure AssemblyAI credentials:
   - API Key: [paste your AssemblyAI API key]

5. Create a transcription skill that can:
   - Download YouTube video audio using the IPRoyal proxy
   - Upload audio to AssemblyAI for transcription
   - Receive and save the cleaned transcript text
   - Delete audio files after transcription (save space)

6. Test by downloading and transcribing this video:
   https://youtube.com/watch?v=LfmzIxwKlA8

Report back when complete with:
- Download status
- Transcription status
- Preview of transcript (first 500 characters)
What OpenClaw will do:
- Install the AssemblyAI SDK and other Python dependencies
- Save your proxy and API credentials securely
- Create the download + transcription workflow
- Test with the sample video
- Return a preview of the transcript
Expected Response: Within 3-5 minutes, OpenClaw reports success and shows you the first 500 characters of the test transcript.
Cost of this test: ~$0.05 (one 11-minute video transcription)
Step 5: Set Up Transcript Analysis and Blog Conversion
 OpenClaw scores the transcript and shows the transformed blog post
Goal: Teach OpenClaw to analyze transcript quality and transform the winner into a blog post.
This step combines two capabilities: intelligent scoring and content transformation.
What we're teaching OpenClaw to do:
- Read multiple transcripts
- Score each on 5 quality dimensions (0-10 scale)
- Select the highest-scoring transcript
- Transform it into structured blog content
Copy these instructions to OpenClaw via Telegram:
Set up transcript analysis and blog post conversion:

1. Create a transcript evaluation skill that scores on:
   - Content depth (0-10): How detailed and valuable is the information?
   - Structure clarity (0-10): Is content well-organized with clear sections?
   - SEO keyword presence (0-10): Natural use of target keywords?
   - Unique insights (0-10): Perspectives not found elsewhere?
   - Audio quality (0-10): Clean transcript with minimal errors?

2. For each transcript being compared:
   - Calculate total score (max 50 points)
   - Provide 1-2 sentence reasoning for each dimension
   - Select the highest-scoring transcript

3. Create a blog post conversion skill that transforms transcripts into:
   - SEO-optimized title based on content
   - Original introduction paragraph with target keyword
   - 5-7 H2 sections extracted from content structure
   - Clean transcript text (remove filler words like "um", "uh")
   - Conclusion paragraph summarizing key takeaways
   - FAQ section with 5 relevant questions
   - Markdown formatting with proper heading hierarchy
   - Frontmatter including title, date, description, keywords
   - Target length: 2000-2500 words

4. Test by converting the transcript from video LfmzIxwKlA8

Report back with:
- The analysis score (out of 50)
- Reasoning for each dimension
- Preview of the generated blog post (title + first 300 words)
What OpenClaw will do:
- Create the scoring algorithm
- Create the blog post template and transformation logic
- Test on the sample transcript from Step 4
- Return the score and a preview of the formatted blog post
Expected Response: A quality score (e.g., "38/50") with justification, plus a preview showing the blog post title and opening paragraphs properly formatted.
Step 6: Run the Complete Pipeline to Create Your First Post
 Live progress updates as OpenClaw executes the 10 → 3 → 1 pipeline
Goal: Execute the entire workflow right now to generate one blog post and verify everything works.
This is your proof-of-concept run. You'll see the full 10 → 3 → 1 selection process in action before scheduling monthly automation.
What happens when you run this: OpenClaw executes all the skills you configured in Steps 3-5:
- Searches for 10 video candidates
- Selects the top 3 based on metadata
- Downloads and transcribes all 3
- Scores each transcript
- Selects the winner
- Converts to a blog post
- Saves to your workspace
Copy this request to OpenClaw via Telegram:
Create 1 high-quality blog post about "pet insurance" right now:

Execute the complete workflow:

1. Find 10 YouTube video candidates about "pet insurance":
   - Duration: 8-15 minutes
   - Views: 10,000-100,000
   - Uploaded in last 2 years
   - Extract metadata (title, views, duration, description)

2. Select top 3 videos based on:
   - View count ranking
   - Metadata quality (title clarity, description depth)

3. Download and transcribe those 3 videos:
   - Use IPRoyal proxy for downloads
   - Use AssemblyAI for transcription
   - Save each transcript with video metadata

4. Analyze all 3 transcripts and score on:
   - Content depth (0-10)
   - Structure clarity (0-10)
   - SEO keyword presence (0-10)
   - Unique insights (0-10)
   - Audio quality (0-10)

5. Select the highest-scoring transcript

6. Convert winner to blog post:
   - SEO-optimized title
   - Proper H2 structure with 5-7 sections
   - 2000-2500 words total
   - Introduction and conclusion
   - FAQ section (5 questions)
   - Markdown formatting

7. Save to: workspace/output/pet-insurance/test-post.md

Send me progress updates as you work through each stage.

Report back when complete with:
- Table of 10 candidates found
- The 3 videos selected for transcription
- Scores for all 3 (with reasoning)
- The winning video title and final score
- Blog post file location
- Total cost breakdown
What to expect: OpenClaw sends progress updates every few minutes as it moves through the pipeline. The entire process takes ~45 minutes.
Progress updates you'll see:
- "Found 10 candidates, here are the top 3..."
- "Transcribing video 1 of 3..."
- "All 3 transcripts complete. Analyzing..."
- "Scores: Video A: 42/50, Video B: 38/50, Video C: 35/50"
- "Winner selected: [title]. Converting to blog post..."
- "Blog post complete! Saved to workspace/output/pet-insurance/test-post.md"
Cost for this test: ~$0.15 (3 videos × $0.05 each)
Purpose: Verify your entire system works before scheduling monthly automation. If this succeeds, you're ready for Step 7.
Step 7: Run Full Automation Monthly for 10 Posts
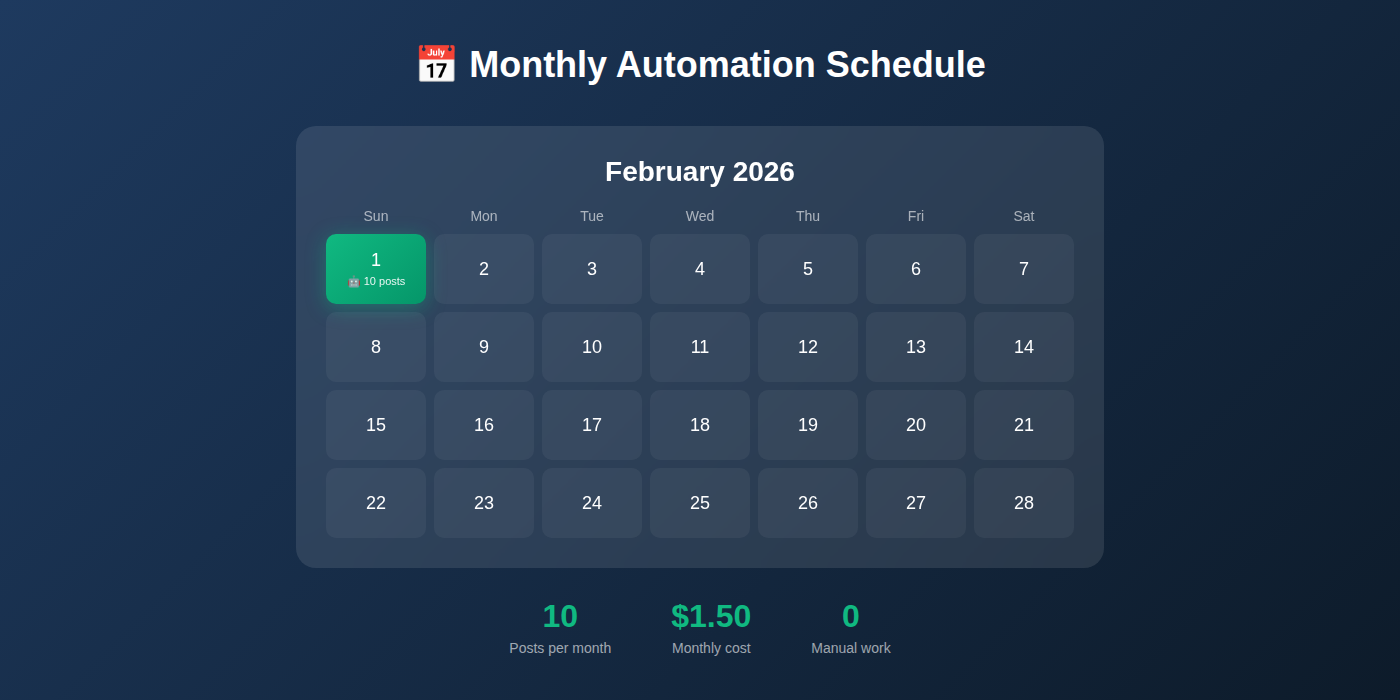 Set and forget: 10 posts delivered to your workspace every month
Goal: Scale up to monthly automation that creates 10 high-quality posts automatically.
Now that Step 6 proved the system works, you can schedule production-scale automation. This runs monthly with a larger pool: 100 candidates → 30 transcripts → 10 best posts.
Why scale to 100 → 30 → 10:
- Larger candidate pool = better quality selection
- 30 transcripts give you enough data to find 10 excellent posts
- Automated scheduling = zero manual work each month
Copy this to OpenClaw via Telegram:
Schedule monthly automation for 10 quality blog posts:

Name: pet-insurance-monthly-10x

Schedule: 1st of every month at 9:00 AM (my timezone)

Workflow (scaled 10x from Step 6):

1. Find 100 YouTube video candidates about "pet insurance"
   - Duration: 8-15 minutes
   - Views: 10,000-100,000
   - Uploaded in last 2 years
   - Extract full metadata for all 100

2. Rank all 100 and select top 30 based on:
   - View count (higher = more validation)
   - Metadata quality score
   - Upload recency (newer = more current)

3. Download and transcribe all 30 videos:
   - Use IPRoyal proxy for downloads
   - Use AssemblyAI for transcription
   - Process in batches to manage API limits

4. Analyze all 30 transcripts with scoring:
   - Content depth (0-10)
   - Structure clarity (0-10)
   - SEO keyword presence (0-10)
   - Unique insights (0-10)
   - Audio quality (0-10)
   - Calculate total score (max 50) for each

5. Select top 10 highest-scoring transcripts

6. Convert all 10 winners to blog posts:
   - SEO-optimized titles (all unique)
   - Proper H2 structure
   - 2000-2500 words each
   - Unique angles for each post
   - FAQ sections
   - Markdown formatting

7. Save to: workspace/output/pet-insurance/YYYY-MM/
   - 10 separate markdown files
   - Include metadata.json with scores and video sources

Send me a Telegram notification when complete with:
- Summary: 100 → 30 → 10 selection funnel results
- List of 10 winning video titles
- Score range (highest to lowest)
- Total cost breakdown
- File locations
- Any errors or issues encountered

Activate this job now.
What OpenClaw will do:
- Create a scheduled job in its cron system
- Execute this workflow on the 1st of every month
- Send you a comprehensive report via Telegram when done
Expected Response: "✅ Scheduled job created: pet-insurance-monthly-10x (runs monthly on 1st at 9:00 AM). Next run: [date]. Job ID: [identifier]"
Monthly Output:
- 10 publication-ready blog posts
- JSON file with all scores and metadata
- Quality range from best to 10th best
- Total cost: ~
$1.50 per month
Monthly Cost Breakdown:
- 30 video transcriptions @
$0.05 each =$1.50 - IPRoyal proxy bandwidth = ~
$0.05 - Total: ~
$1.55 per month for 10 posts
Per-post economics: $0.155 per post vs. $100-200 traditional = 645x-1290x cost savings
Step 8: Scale to Multiple Niches
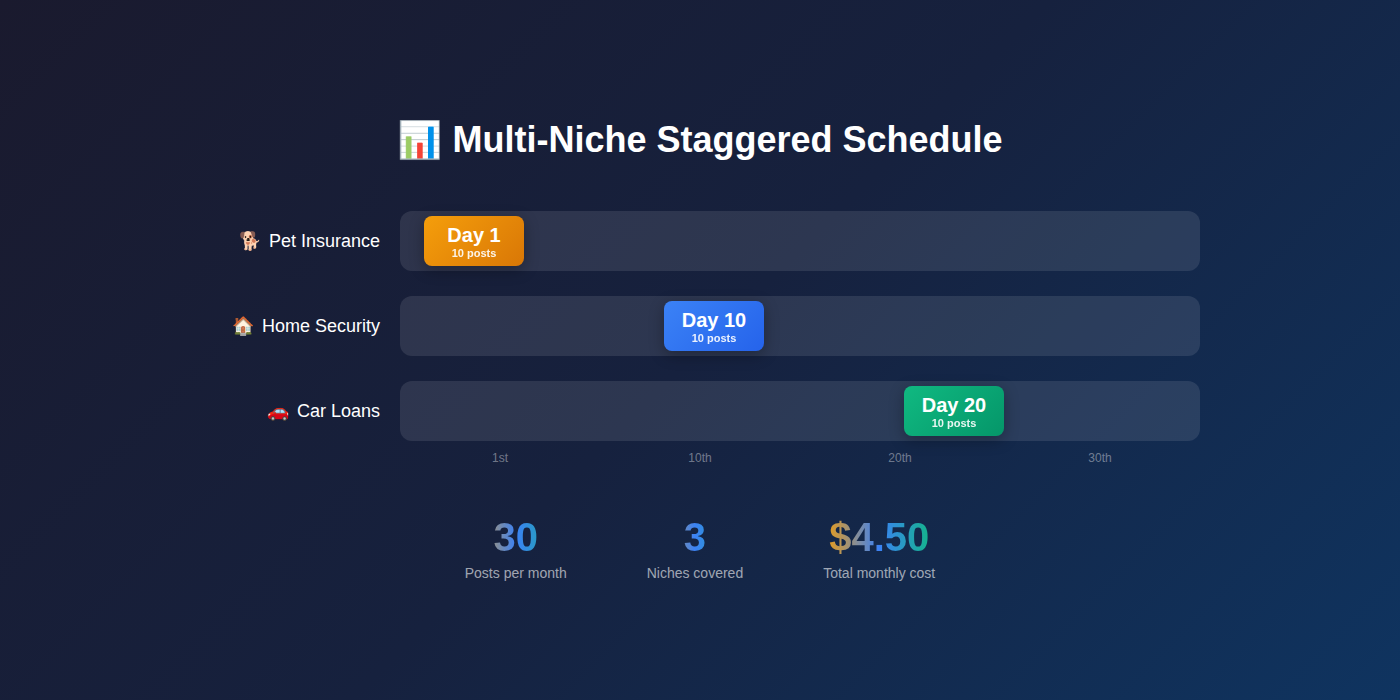 Scale to multiple niches with staggered monthly schedules
Goal: Expand to multiple niches by scheduling additional automation jobs on different days.
The same pipeline works for any niche. Simply repeat Step 7 with different keywords and stagger the schedule across the month.
Example Multi-Niche Strategy:
- Day 1: Pet insurance (10 posts)
- Day 10: Home security (10 posts)
- Day 20: Car loans (10 posts)
Total: 30 posts per month across 3 niches for ~$4.65/month
To add another niche, send Step 7's instructions again with these changes:
- Different niche keyword (e.g., "home security" instead of "pet insurance")
- Different schedule day (e.g., "10th of every month")
- Different output folder (e.g.,
workspace/output/home-security/)
Managing Multiple Jobs:
To see all your scheduled automations:
List all my scheduled jobs
To pause or remove a job:
Remove the job named "pet-insurance-monthly-10x"
To run a job immediately (off-schedule):
Run the job "home-security-monthly-10x" now
Quality Control at Scale: Even with automation, review the top post from each batch monthly. This helps you:
- Spot any drift in quality
- Identify better search filters
- Adjust scoring weights if needed
Cost Analysis
 Automation economics: costs stay flat while traditional scales linearly
Per-Post Economics (Evaluating 3 Videos):
- Metadata extraction:
$0.00 (search is free) - 3 video transcriptions: ~
$0.12 (3 ×$0.04) - Analysis + conversion: ~
$0.01 (minimal compute) - Proxy bandwidth: ~
$0.01 - Total per post: ~
$0.15
Monthly Costs by Scale:
| Posts/Month | Transcripts | Cost/Month | Per-Post | vs. Traditional |
|---|---|---|---|---|
| 1 post | 3 videos | $0.15 | $0.15 | 667x savings |
| 10 posts | 30 videos | $1.50 | $0.15 | 667x savings |
| 30 posts | 90 videos | $4.50 | $0.15 | 667x savings |
Traditional Content Creation Comparison:
- Freelance writer:
$100-200per 2000-word post - Content agency:
$200-500per post - In-house writer:
$30-50/hour × 3-4 hours =$90-200
Your automated pipeline: $0.15 per post (no quality compromise)
Break-Even Analysis:
- Traditional: 10 posts =
$1,000-2,000 - This pipeline: 10 posts =
$1.50 - Savings:
$998-1,998per 10 posts - One-time setup (
$10-20) pays for itself after your first 2 posts
Scaling to More Posts
 Scale horizontally: run parallel pipelines for multiple niches
Want 20 posts per month from one niche?
Simply adjust the Step 7 instructions:
- 200 candidates → 60 transcripts → 20 posts
- Cost: ~
$3/month for 20 posts
Want daily posts?
Schedule the job to run weekly instead of monthly:
- "Every Monday at 9:00 AM"
- 100 → 30 → 10 workflow
- ~40 posts per month
- Cost: ~
$6/month
Quality vs. Quantity Balance:
The 100 → 30 → 10 funnel maintains quality because:
- Large candidate pool (100) ensures options
- Transcribing 30% (30 of 100) is thorough
- Taking top 33% (10 of 30) guarantees quality
If you reduce the funnel (e.g., 50 → 15 → 10), quality may drop because:
- Smaller candidate pool = fewer good options
- Less selective (taking 67% instead of 33%)
Recommendation: Keep the 100 → 30 → 10 ratio even as you scale niches.
Troubleshooting
 Troubleshooting guide: identify the error and apply the fix
Issue: "No videos found for niche"
Cause: Search criteria too restrictive or niche keyword too specific
Solutions:
- Broaden view range: 5k-200k instead of 10k-100k
- Extend duration: 5-20 minutes instead of 8-15
- Adjust recency: last 3 years instead of 2
- Try related keywords: "pet insurance tips" instead of just "pet insurance"
Issue: "Proxy authentication failed"
Cause: IPRoyal credentials incorrect or expired
Solutions:
- Verify credentials copied correctly (no extra spaces)
- Check IPRoyal dashboard—account active?
- Confirm 1GB balance remaining
- Try recreating the proxy order
Issue: "Transcription failed" or "API quota exceeded"
Cause: AssemblyAI free tier exhausted (5 hours) or API key invalid
Solutions:
- Check AssemblyAI dashboard for usage
- Upgrade to paid plan if over free tier
- Verify API key hasn't expired
- Check for typos in API key
Issue: "All transcripts score below 30/50"
Cause: Low-quality video sources or incorrect niche
Solutions:
- Review the 10 candidates—are they relevant?
- Adjust search keyword to be more specific
- Increase view count minimum (better production quality)
- Check if niche has enough educational content
Issue: "Blog post is too short (under 1500 words)"
Cause: Source video lacks depth or transcript incomplete
Solutions:
- Increase minimum video duration to 10-18 minutes
- Check that transcripts are complete (not cut off)
- Adjust selection to favor longer, more detailed videos
Ask OpenClaw for Help:
You can always ask your bot directly:
What went wrong with the last job?
Show me the error log for job pet-insurance-monthly-10x
Why did video ABC123 score only 25/50?
OpenClaw can pull logs and explain issues based on the actual errors encountered.
Conclusion
 Your automated content engine: delivering quality posts on schedule
You've built a production-ready content automation pipeline that makes intelligent decisions. Unlike simple "convert any video to text" tools, your system:
Finds quality sources: Filters by proven engagement metrics
Evaluates thoroughly: Scores 3 candidates on 5 dimensions
Selects the best: Chooses highest-quality content automatically
Transforms professionally: Creates structured, SEO-optimized posts
Real capabilities:
- Single post (Step 6): Manual trigger, 10 → 3 → 1 selection, ~45 minutes
- Monthly automation (Step 7): Set-and-forget, 100 → 30 → 10 posts,
$1.50/month - Multi-niche scaling: 3 niches × 10 posts = 30 posts/month for
$4.50
Economics that matter:
- Traditional:
$100-200per post - This pipeline:
$0.15 per post - Savings: 667x-1333x
Time savings:
- Traditional: 3-4 hours per post
- This pipeline: 5 minutes setup + automated
Next steps:
- Test with Step 6 (create your first automated post)
- Verify quality of the output
- Activate Step 7 (monthly automation)
- Add more niches as needed
- Review top post from each batch for quality control
Future enhancements you can add:
- Multi-language support (Spanish, French, etc.)
- Automatic image sourcing from videos
- Direct publishing to WordPress/Ghost/Medium
- SEO keyword research integration
- Social media promotion automation
You now have a content system that runs while you sleep. Every month, OpenClaw delivers publication-ready posts to your workspace—no manual work required.
FAQ
 Common questions about setup, scaling, and automation answered
How automated is this really?
Fully automated after setup. You message OpenClaw once per month (or set a schedule and forget it). The system handles discovery, transcription, analysis, selection, and creation. You only review the final posts before publishing.
What if I don't know coding or Python?
You don't need to code. All scripts are provided as copy-paste instructions to OpenClaw. OpenClaw handles the technical implementation. You just send Telegram messages in plain English.
Can I customize the blog post format?
Yes. The conversion template in Step 5 can be modified. Tell OpenClaw: "Update the blog post template to include [your requirements]" and it will adjust the format.
How many posts can I generate per month?
Limited only by budget and time:
- 1 post:
$0.15/month - 10 posts:
$1.50/month - 100 posts:
$15/month - The system scales linearly
Is the content unique enough for SEO?
Yes. Each transcript is unique, and the transformation adds your structure and SEO optimization. Google treats properly transformed content as original. You should add your own commentary and insights in the introduction and conclusion sections to further differentiate.
What niches work best?
Any topic with:
- 8-15 minute YouTube videos
- 10k-100k view range
- Educational or explanatory content
- Recent uploads (last 2 years)
Examples: SaaS tools, financial products, insurance, health topics, home improvement, technology tutorials, business strategies.
Do I need OpenClaw specifically, or can I use another automation tool?
OpenClaw is required for this tutorial because it orchestrates multiple services (browser automation, API calls, file management, scoring logic) and provides Telegram control. Other tools would require significant custom scripting.
Can I run this on Google Cloud or Azure instead of AWS?
Yes. OpenClaw runs on any Linux server. The same setup works on GCP, Azure, DigitalOcean, or even a home server. Only requirement: outbound internet access for API calls.
What if all 3 transcripts score below 30/50?
OpenClaw can automatically search for 10 new candidates if you configure a minimum score threshold. Or you can manually trigger another search with adjusted criteria (different keyword, broader filters).
How long does the monthly job take to run?
100 → 30 → 10 workflow: ~2-3 hours
- Discovery: 5 minutes
- 30 transcriptions: 90-120 minutes (processed in parallel batches)
- Analysis: 10-15 minutes
- Conversion: 10-15 minutes
Can I adjust the scoring criteria?
Yes. Tell OpenClaw which dimensions matter most to you. For example: "Weight SEO keyword presence 2x higher than other factors" or "Prioritize unique insights over audio quality."
What happens if a scheduled job fails?
OpenClaw sends you a Telegram alert with the error. You can check logs, diagnose the issue, and re-run manually. Common failures: API quota exceeded, no candidates found, proxy connection timeout.
Can I use this for videos in other languages?
Yes, with AssemblyAI's language support. Specify the language in Step 4: "Transcribe with AssemblyAI using Spanish language model" or similar. Note: blog post conversion currently optimized for English—other languages may need template adjustments.
More Articles
The Ultimate OpenClaw AWS Setup Guide
The definitive guide to setting up OpenClaw on AWS. Includes spot instance configuration, cost optimization, and step-by-step instructions.
Building AI Workflows with Tool Chaining in OpenClaw
Master the art of chaining tools and function calls to build powerful multi-step AI automation workflows—from data extraction to content generation and deployment.
Cost Optimization Guide for Self-Hosted AI Assistants: Run Claude on a Budget
Practical strategies to reduce API costs for self-hosted AI assistants—smart model routing, caching, batching, and OpenClaw-specific optimizations to run Claude affordably.